- မုိက္ခရုိေဆာ႕ ေအာ႔ဖစ္ ၂၀၁၀ ဖူးဘာရွင္း၊
- ရွိသမွ် အေကာင့္ေတြနဲ ့ mail အားလံုး တစ္ျပိဳင္တည္း စစ္ၿပီး Special ဂ်ီပုန္းလုပ္ၾကရေအာင္၊
- ၀င္းဒိုး password ကို မိမိမ်က္ႏွာနဲ႔ ေပးၾကရေအာင္၊
- ႏုိင္ငံျခားကုိ Unlmited call ေခၚႏုိင္မယ့္ Skype၊
- မိမိ အၾကိဳက္ဆံုး video ကို screen saver အျဖစ္ထားၾကရေအာင္ (.scr file Only 1 MB)၊
- သီခ်င္းေခြတြင္ထည့္သြင္းထားေသာ ဗိုင္းရပ္စ္အေၾကာင္း၊
- Software မလိုဘဲ တကမၻာလံုးရဲ႔ TV လိုင္းၾကည့္မယ္။
- Windows 7 Start Button Creator 1.0၊
- english ေလ႕လာေနတဲ႕သူငယ္ခ်င္းေတြအတြက္ Oxford Word Skills Advanced software !!!
- Download sites အမ်ိဳးမ်ိဳးမွ Download နည္းအမ်ိဳးမ်ိဳး ၊
- tune uo 2010 ၊
- VCD,CD,DVD,SVCD,Data CD, Blue Ray Dics ေတြ Burn ဖုိ႕ Cool Burning Studio v4.1.1.1 Full Free Download!!!
- CD,DVD ROM ရဲ ့Right Click မွာ Insert ေလး ထည့္ထားရေအာင္၊
- Nero သံဳးတဲ႕သူေတြအတြက္ Nero Multimedia Suite 10.5 Platinum HD Full Free Download !!!
- Romantic ဆန္တဲ႕ ဓါတ္ပံဳ Frame ေလးေတြလုပ္ဖုိ႕ Frame Photo Creator 4.3.3 Full Free Download !!!
မုိက္ခရုိေဆာ႕ ေအာ႔ဖစ္ ၂၀၁၀ ဖူးဘာရွင္း
ကၽြန္ေတာ္တုိ႕ သူငယ္ခ်င္းေတြအတြက္ မုိက္ခရုိေဆာ႕ ၂၀၁၀ ကုိ ဖူးဘာရွင္း တင္ေပးလုိက္ပါတယ္။ ကၽြန္ေတာ္ တင္ေပးဖုိ႕ ၾကိဳစားတာအေတာ္ၾကာပါျပီ။ ဒါေပမဲ႕ ပထမတစ္ၾကိမ္တင္ေပးဖုိ႕ Upload တင္ျပီတာနဲ႕ အလုပ္မလုပ္ သိရေအာင္ ကိုယ္တုိင္ျပန္ေဒါင္းတာကုိ Link ေတြက Download ခ်လို႕ မရပါဘူး။ အေၾကာင္းက ကၽြန္ေတာ္က မိုက္ခရုိေဆာ႕ ၂၀၁၀ ဖူးဘာရွင္းဆုိျပီ အဂၤလိပ္လုိ တုိက္ရုိက္ေရးျပီ တင္လုိက္တာေၾကာင္႔ မုိက္ခရုိေဆာ႕ က ေဒါင္းလုိ႕မရေအာင္ ဖ်က္လုိက္တာျဖစ္ပါတယ္။ ကၽြန္ေတာ္တုိ႕က အလကားတင္ေပးတာကုိး မဖ်က္ဘဲ ဘယ္ရွိပါ႔မလဲ။ ဒါေၾကာင္႔ စိတ္မေလ်ာ႕ေသးဘဲ စာဖတ္သူေတြအတြက္ ေနာက္တစ္ၾကိမ္ လူလယ္လုပ္ျပီး ျပန္တင္ေပးလုိက္တာ နံမည္ ကုိေတာင္ အဂၤလိပ္လုိ မေရးရဲဘူး ျမန္မာလုိဘဲ ေရးတင္လုိက္တယ္။ မုိက္ခရုိေဆာ႕ ၂၀၁၀ က အေတာ္ေကာင္းပါတယ္။ featured ေတြလဲ အေတာ္စုံပါတယ္။ လုပ္ရကုိင္ရတာလဲ အေတာ္ ေပါ႕ပါး သြက္လက္ပါတယ္။ ဖူးဘာရွင္းလဲ ျဖစ္လုိ႕ အလကား လုိခ်င္က်ေသာ ေရႊျမန္မာ ေတြအတြက္ တင္ေပးလုိက္တယ္။ Rar နဲ႕ ခ်ဳံေပးလုိက္တယ္။ ၂၀၀၇ သုံးေနတဲ႕ သူငယ္ခ်င္းေတြအေနနဲ႕ ၂၀၁၀ က ပုိသုံးရ ႏွစ္သက္က်မွာပါ။
မွတ္ခ်က္။ ။ ေအာ႕ဖစ္စ္ ၂၀၁၀ Part01.၁၂၃ လုိ႕ ေဒါင္းျပီသာေတြကုိ ေအာ႕ဖစ္စ္ ၂၀၁၀ Part01.rar လို႕ျပန္ေျပာင္းျပီမွ Extract လုပ္ပါ။
- ေအာ႕ဖစ္စ္ ၂၀၁၀.part01.၁၂၃
- ေအာ႕ဖစ္စ္ ၂၀၁၀.part02.၁၂၃
- ေအာ႕ဖစ္စ္ ၂၀၁၀.part03.၁၂၃
- ေအာ႕ဖစ္စ္ ၂၀၁၀.part04.၁၂၃
- ေအာ႕ဖစ္စ္ ၂၀၁၀.part05.၁၂၃
- ေအာ႕ဖစ္စ္ ၂၀၁၀.part06.၁၂၃
- ေအာ႕ဖစ္စ္ ၂၀၁၀.part07.၁၂၃
- ေအာ႕ဖစ္စ္ ၂၀၁၀.part08.၁၂၃
- ေအာ႕ဖစ္စ္ ၂၀၁၀.part09.၁၂၃
- ေအာ႕ဖစ္စ္ ၂၀၁၀.part10.၁၂၃
ရွိသမွ် အေကာင့္ေတြနဲ ့ mail အားလံုး တစ္ျပိဳင္တည္း စစ္ၿပီး Special ဂ်ီပုန္းလုပ္ၾကရေအာင္
မ်ားေသာအားျဖင့္ Browser တစ္ခုမွာ mail တစ္ခုပဲ ဖြင့္လို ့ရတယ္လို ့ပဲ သိထားၾကပါတယ္ ။ အဲ့ဒါေၾကာင့္ gmail အေကာင့္ ႏွစ္ခု သံုးခု ရွိတဲ့ သူေတြ အတြက္ mail စစ္ရတာ ဘယ္လိုမွ အဆင္မေျပႏိုင္ေတာ့ပါဘူး ။ တစ္ျပိဳင္တည္း စစ္ခ်င္တယ္ဆိုရင္ေတာ့ မတူညီတဲ့ browser ေတြကို အသံုးျပဳရပါတယ္ ။ (mozilla , IE , Chrome) အစရွိသျဖင့္ေပ့ါ ။ အဲ့ဒါဆို ကြန္နက္ရွင္ အေျခအေနနဲ ့ဘာနဲ ့ ညာနဲ ့ အဆင္မေျပမႈေတြ အရမ္းမ်ားပါတယ္ ။ ၿပီးေတာ့ invisible နဲ ့ဂ်ီပုန္းလုပ္ၿပီး ပတ္ေျပးေနတဲ့ သူေတြ အတြက္လည္း အဆင္ေျပမွာမဟုတ္ပါဘူး ။ (ကၽြန္ေတာ့္လို ေပ့ါ ... ဟိုအေကာင့္နဲ ့လည္ းအြန္လိုင္း မတက္ရဲ .. ဒီအေကာင့္နဲ ့လည္း အြန္လိုင္း မတက္ရဲ .... ဘာလို ့မတက္ရဲ တာလဲလို ့ေတာ့ မေမးၾကနဲ ့ေပ့ါ....ေၾကြးရွင္ေတြ ရွိတာကို .. ဟိဟိ .. ေပၚကုန္ၿပီ .... ) ။ ဒါေပမဲ့ ခုေနာက္ထပ္ gmail မွာ feature တစ္ခုအေနနဲ ့ Use multiple Google Accounts in the same web browser. ဆိုၿပီး ထပ္ေပါင္းထည့္ေပးထားပါတယ္ ။ (ဘယ္အခ်ိန္ထဲက ထည့္ေပးထားတာလဲေတာ့ မသိဘူး ခုမွေတြ ့လို ့.. တယ္မိုက္ေနတာ .. ဟဲ ဟဲ ) ။ လုပ္ေဆာင္ရမွာကလည္း လြယ္မွလြယ္ .... ။ အရင္ဆံု း password ခ်ိန္းမဲ့ အဆင့္ေတြ အတိုင္း အရင္ သြားလိုက္ေပ့ါ ။ Mail ထဲမွာ ။ (အဲ .. အဲ့ဒါက တစ္ခါတည္း လုပ္ေပးထားရံုနဲ ့ တစ္သက္လံုး သံုးလို ့ရတယ္ေနာ္... ။ )Mail -->>Settings-->>Account and Imports-->>Google account settings
အဲ့အဆင့္ေတြ အတိုင္း သြားၿပီးၿပီ ဆိုရင္ေတာ့ Personal Settings ဆိုတဲ့ ေနရာေလးမွာ ေအာက္ပါ ပံုေလးအတိုင္း ထပ္ေပါင္းထည့္ေပးထားတဲ့ feature ေလးကို ျမင္ရမွာ ျဖစ္ပါတယ္ ။ (မ်က္စိပဲ ရွမ္းတာလား ဘာလားေတာ့မသိဘူး အရင္က မျမင္မိတာေတာ့ ေသခ်ာတယ္ . )

အဲ့မွာ edit ကို ႏွိပ္ေပ့ါ .. ႏွိပ္လိုက္တာနဲ ့ ေလာေလာဆယ္ေတာ့ off ဆိုတာကို ေရြးထားလိမ့္မယ္ ။ အဲ့မွာ အေပၚ က On ဆိုတာေလးကို ေရြး ၊ Check Box 4 ခုလံုးကို အမွန္ျခစ္ထည့္

ပံုမွာ ျပထားတဲ့ အတိုင္းေပ့ါ ။ ၿပီးရင္ေတာ့ Save ကို ႏွိပ္လိုက္ပါ ။ အဲ့ဒါဆိုရင္ေတာ့ လုပ္ေဆာင္ခ်က္ေတြ အားလံုး ၿပီးသြားပါၿပီ ။ mail ကို ျပန္သြားၿပီး Refresh(F5) တစ္ခ်က္ ႏွိပ္ေပးလိုက္ပါ ။ အဲ့ဒါဆိုရင္ေတာ့ အေပၚေထာင့္က မိမိ account name ရဲ ့ေဘးနားမွာ ဒီလိုေလး ေပၚလာပါၿပီ ။

အဲ့မွာ sign in to another account ကို ႏွိပ္လိုက္တာနဲ ့ (mozilla ပဲ သံုးတယ္ ဆိုၾကပါစို ့)browser ရဲ ့ tab ေနာက္တစ္ခုမွာ

ဒီလိုေလး sign in page ေလး က်လာပါလိမ့္မယ္ ။ အဲ့ဒါဆိုရင္ေတာ့ Browser တစ္ခုထဲမွာပဲ မိမိရဲ ့ gmail account ရွိသေလာက္ကို တစ္ျပိဳင္တည္း ဖြင့္လို ့ရႏိုင္ပါၿပီ ။ တကယ္လို ့ေနာက္ထပ္ ဖြင့္လိုက္တဲ့ အေကာင့္က မေပၚပဲ အရင္အေကာင့္ပဲ ေပၚေနတယ္ဆိုရင္ ခုနက အေကာင့္ေဘးနားရဲ ့ျမွားေလးမွာ မိမိ ဖြင့္ထားရင္ ဖြင့္ထားသေလာက္ အေကာင့္ နာမည္ေတြ ေပၚေနပါလိမ့္မယ္ ။ အဲ့ဒါေလးေတြကို ေရြးေပးလိုက္ရံံုနဲ ့ browser တစ္ခုထဲမွာ အဆင္ေျပေျပနဲ ့ mail ေတြ အကုန္လံုး စစ္လို ့ရႏိုင္ၿပီး အေကာင့္ေတြ အားလံုးကိုလည္း တစ္ျပိဳင္တည္း invisible (ဂ်ီပုန္း) လုပ္ႏိုင္ၿပီ ျဖစ္ပါတယ္ ။ (ဒါေပမဲ့ အဲ့ေနရာမွာ တစ္ခုေတာ့ အဆင္မေျပတာ ရွိပါတယ္ .. multiple ၀င္ထားတဲ့ mail အေကာင့္ တစ္ခုခု sign out လုပ္လိုက္တာနဲ ့mail အကုန္လံုး လိုက္ၿပီး sign
out ျဖစ္ကုန္ပါလိမ့္မယ္ ။ ဒါေပမဲ့ အဲ့ဒါေလာက္နဲ ့ေတာ့ အဆင္မေျပဘူးလို ့မျမင္မိပါဘူး) ။ မိမိ အသံုးအမ်ားဆံုး ျဖစ္တဲ့ mail တစ္ခုတည္းရဲ ့ multiple sessions တစ္ခုတည္းကို on ေပးထားရံုနဲ ့mail အကုန္လံုး သံုးလို ့ရႏိုင္မွာ ျဖစ္ၿပီး ၊ အဲ့ on ထားတဲ့ mail account က default , primary mail အျဖစ္ရွိေနမွာ ျဖစ္ပါတယ္ ။ (ဆိုလိုတာက mail အေကာင့္ ရွိသေလာက္ လိုက္လုပ္ေနစရာမလိုပဲ တစ္ခု လုပ္ထားရံုနဲ ့ရတယ္လို ့ေျပာတာပါ။ လုပ္ထားတဲ့ အေကာင့္ကို အရင္ဖြင့္ဖို ့ေတာ့ လိုတာေပ့ါေနာ္ ) ။ တစ္ခု တည္း on ေပးထားရံုနဲ ့ ဘယ္ေနရာ ဘယ္ဌာန ေရာက္ေရာက္ ကို တစ္သက္လံုး သံုးလို ့ရႏိုင္ပါၿပီ ။ အဆင္ေျပေျပနဲ ့ ေမးလ္ အားလံုး တစ္ျပိဳင္တည္း စစ္ႏိုင္ၿပီး ......
၀င္းဒိုး password ကို မိမိမ်က္ႏွာနဲ႔ ေပးၾကရေအာင္
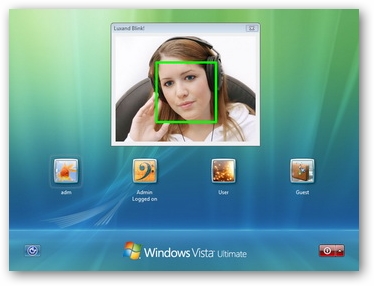
ဒီေစာ့၀ဲေလးကေတာ့ Password ကိုအသံုးမျပဳခ်င္တဲ႔ သူေတြအတြက္ Webcam ကိုအသံုးျပဳျပီးေတာ့ Login လုပ္ႏိုင္တဲ႔
ေစာ့၀ဲေလးပဲျဖစ္ပါတယ္.....ဒီေစာ
အသံုးျပဳလို႔မရေတာ့ပါဘူး.... ဒီေစာ့၀ဲ Support လုပ္ေဆာင္တဲ႔ Windows ေတြကေတာ့ 32 Bit Windows Vista နဲ႔
ေစာ့၀ဲေလးပဲျဖစ္ပါတယ္.....ဒီေစာ
အသံုးျပဳလို႔မရေတာ့ပါဘူး.... ဒီေစာ့၀ဲ Support လုပ္ေဆာင္တဲ႔ Windows ေတြကေတာ့ 32 Bit Windows Vista နဲ႔
Seven မွာပဲျဖစ္ပါတယ္......စိတ္၀င္စား

ႏုိင္ငံျခားကုိ Unlmited call ေခၚႏုိင္မယ့္ Skype

ကမာၻေက်ာ္ Skype ဖုန္းကုိ ၂၀၀၃ ခုႏွစ္တြင္ eBay ပုိင္ဆုိင္ေသာ စီးပြားေရးအုပ္စုႀကီးမွ လူဇင္ဘတ္ႏုိင္ငံတြင္ တည္ေထာင္ခဲ့ၿပီး ယခု အခါ ကမာၻတဝန္း user သန္းေပါင္း ၂၀၀ ေက်ာ္ ရွိၿပီး VOIP မ်ားထဲတြင္ အျမင့္မားဆုံး ႏႈန္းျဖင့္ ရပ္တည္ေနပါတယ္။ Voip service တစ္ခုအေနျဖင့္ user သန္း ၂၀၀ ေက်ာ္ ရွိတာဟာ Social Networking ဆုိက္ေတြကုိ ေကာင္းေကာင္းယွဥ္ႏုိင္တဲ့ပမာဏပါ
စကၤာပူအေျခစုိက္ Star Hub မွ Pfingo service ျဖင့္ စကၤာပူေစ်းကြက္ႏွင့္ အေရွ႕ေတာင္အာရွ ေစ်းကြက္ေတြမွာ ေနရာယူဖုိ႔ ႀကိဳးစားေနေပမယ့္ Unlimited plan မ်ား ေရြးခ်ယ္ႏုိင္စြမ္းမွာေတာ့ ဥေရာပက Skype ကုိေကာင္းေကာင္းမယွဥ္ႏုိင္ေသးပါ
Skype ကုိ အေရွ႕အာရွ ႏုိင္ငံေတြမွာေတာ့ ေစ်းကြက္ အထူးစုိးမုိးမႈရွိေနၿပီး ဂ်ပန္ တြင္မူ Convenience Stores ေတြမွာ လြယ္ကူစြာဝယ္ယူႏုိင္ပါတယ္။
Skype မွာ ကမာၻ႕ႏုိင္ငံ အေတာ္မ်ားမ်ားကုိ Unlimited Call (အကန္႔အသတ္မရွိ ေခၚဆုိႏုိင္ျခင္း) ရွိတဲ့အတြက္ ျပည္ပႏွင့္ ဆက္သြယ္အလုပ္လုပ္ကုိင္ေနတဲ့ ျပည္တြင္းကုမဏီတစ္ခ်ိဳ႕တြင္ အသုံးခ်လာတာကုိ ေတြ႕ရပါတယ္။ အထူးအသုံးခ်ေနတာကေတာ့ "ပီဖင္းဂုိး ျဖင့္ ႏုိင္ငံျခားသုိ႔ ဖုန္းေခၚဆုိႏုိင္ပါသည္" လုိ႔ အသိေပးထားတဲ့ အင္တာနက္ဆုိင္ေတာ္ေတာ္မ်ားမ်ား
Skype နဲ႔ ပက္သက္ၿပီး အေသးစိတ္ သိလုိ႔ပါက www.skype.com တြင္ ေလ့လာႏုိင္ၿပီး မ်ားျပားလွတဲ့ ယေန႔ကမာၻရဲ႕ Mobile Devices အမ်ိဳးမ်ိဳးအတြက္ Skype Softwares မ်ားကုိလည္း ေရြးခ်ယ္ၿပီး အခမဲ့ ရယူႏုိင္ပါတယ္။ ယခုအခါ Skype ကို ipad, ipod touch ႏွင့္ Sony PSP ကဲ့သုိ႔ေသာ ဖုန္း မဟုတ္တဲ့ device ေတြမွာပါ အသုံးခ်လာႏိုင္တဲ့အတြက္ wifi ဧရိယာထဲ ေရာက္လုိ႔ လက္ကုိင္ဖုန္း မပါလာရင္ေတာင္ လြယ္လင့္တကူ ႏုိင္ငံတကာကုိ ဆက္သြယ္ႏုိင္လာပါတယ္။
ျပည္တြင္းကုမၸဏီမ်ားအေနျဖင့္ ရုံးပုိင္းဆန္ဆန္ အသုံးျပဳႏုိင္ဖုိ႔အတြက္ ဥေရာပ အေျခစုိက္ Belkin မွ ထုတ္လုပ္တဲ့ Desktop Skype ဖုန္းမ်ားကုိလည္း ျပည္တြင္းရွိ ကြန္ပ်ဴတာ အေရာင္းဆုိင္ႀကီးေတြမွာ ေဒၚလာ ၁၅၀ ခန္႔ျဖင့္ဝယ္ယူႏုိင္ေနပါၿပီ။ အဆုိပါဖုန္းကုိ ကြန္ပ်ဴတာအတြက္ အင္တာနက္ LAN 8 pin ကုိ တပ္ဆင္လုိက္ၿပီး Account ထည့္သြင္းလိုက္ပါက သာမာန္ (PSTN) ဖုန္းေတြလုိပဲ အသုံးျပဳႏုိင္ပါမယ္။ (အဲ..သာမာန္ဖုန္းဆုိလုိ႔ ျပည္တြင္းေတာ့ မေခၚလုိက္ပါနဲ႔...ျမန္မာျပည္ကုိ တစ္မိနစ္ကုိ ေဒၚလာဝက္ေလာက္က်သင့္တဲ့အတြက္ေၾ

Skype မွာ Unlimited ေခၚဆုိႏုိင္မယ့္ ႏုိင္ငံမ်ားကေတာ့ ၄၂ ႏုိင္ငံျဖစ္တဲ့အတြက္ မနည္းလွဘူးလုိ႔ ဆုိႏုိင္ပါတယ္။ အဆုိပါ ၄၂ ႏုိင္ငံမွာ ျမန္မာျပည္ႏွင့္ ကူးသန္းေရာင္းဝယ္မႈျပဳေနၾကတဲ့ အဆက္အဆံရွိတဲ့ ႏုိင္ငံေတြ ပါဝင္ေနတဲ့အတြက္ ဝမ္းသာစရာပါပဲ။ ( အာဖရိက ႏုိင္ငံမ်ားႏွင့္ အေရွ႕အလယ္ပုိင္း ႏုိင္ငံမ်ားကေတာ့ မပါဝင္ေသးေၾကာင္းပါ...)
Skype တြင္ unlmited ေခၚဆုိႏုိင္တဲ့ႏုိင္ငံမ်ားကေတာ့
ထုိင္း(မုိဘုိင္းအပါအဝင္)
စကၤာပူ (မုိဘုိင္းအပါအဝင္)
အေမရိကား (မုိဘုိင္းအပါအဝင္)
ေဟာင္ေကာင္ (မုိဘုိင္းအပါအဝင္)
ကေနဒါ (မုိဘုိင္းအပါအဝင္)
တရုတ္(မုိဘုိင္းအပါအဝင္)
ေပၚတုိရီကုိ(မုိဘုိင္းအပါအဝင္)
ဂူအမ္(မိုဘုိင္းအပါအဝင္)
အာဂ်င္တီးနား
ၾသဇီ (ၾသစေၾတးလ်)
ၾသစႀတီးယား
ဘယ္ဂ်ီယံ
ခ်ီလီ
ခ်က္
ခရိုေအးရွား
ဒိန္းမက္
အက္စတုိးနီးယား
ဖင္လန္
ျပင္သစ္
ဂ်ာမနီ
ဂရိ
ဟန္ေဂရီ
အုိင္ယာလန္
အစၥေရး
အီတလီ
ဂ်ပန္
ေတာင္ကုိရီးယား
လူဇင္ဘတ္
မေလးရွား
နယ္သာလန္
နယူးဇီလန္
ေနာ္ေဝး
ပုိလန္
ေပၚတူဂီ
႐ုရွ
စလုိဗားကီးယား
စပိန္
ဆြီဒင္
ဆြစ္ဇာလန္
ထုိင္ဝမ္
ၿဗိတိန္ စတဲ့ႏုိင္ငံေတြပဲျဖစ္ပါတယ္။
ဝယ္ယူမယ္ဆုိရင္ေတာ့ တစ္ႏုိင္ငံတည္းဆုိရင္ တစ္လကုိ ၇၅၀၀ က်ပ္သာ က်သင့္မွာျဖစ္ၿပီး ႏုိင္ငံ ၄၂ ႏုိင္ငံလုံးဆုိရင္ေတာ့ တစ္လကုိ ၁၅၀၀၀ က်ပ္သာ က်သင့္ပါမယ္။
အထက္ပါႏုိင္ငံမ်ားထဲမွာ ျမန္မာေတြအသြားမ်ားတဲ့ မေလးရွားကေတာ့ ႀကိဳးဖုန္းကုိပဲ unlimited ရတဲ့အတြက္ ကုမၸဏီေတြအေနျဖင့္ ႀကိဳးဖုန္းသုိ႔ ေခၚဆုိမႈမ်ားေသာ္လည္း အင္တာနက္ဆုိင္မ်ားႏွင့္ personal call ေခၚဆုိလူမ်ားအေနျဖင့္
Skype ရဲ႕ credit plan ( ႀကိဳက္သေလာက္ေျပာ က်သေလာက္ရွင္း plan)နဲ႔
Skype ရဲ႕ Limited Minutes plan ( မိနစ္ ပုတ္ျပတ္plan) ေတြကုိ ထပ္မံေရြးခ်ယ္ခြင့္ရွိပါေသးတယ္။
Credit plan ဆုိတာကေတာ့ ပီဖင္းဂုိး Credit ကဲ့သုိ႔ပဲ ေငြထည့္ထားၿပီး ေခၚဆုိသေလာက္ ႏႈန္းသြားတာပါ။ မေလးရွားကုိ တစ္မိနစ္ကုိ ၆၀ က်ပ္ေလာက္က်ပါမယ္။ Credit ၅ ေဒၚလာ ကုိ ၆၀၀၀ က်ပ္။ Credit ၁၀ ေဒၚလာကုိ ၁၁၅၀၀ က်ပ္ ႏႈန္းျဖင့္ဝယ္ယူႏုိင္ပါတယ္။
Limited Minutes plan (မိနစ္ ပုတ္ျပတ္ plan) မွာေတာ့ မိမိ ေခၚဆုိလုိတဲ့ ႏုိင္ငံကုိ တစ္လအတြင္း မိနစ္ ၆၀၊ မိနစ္ ၁၂၀၊ မိနစ္ ၄၀၀ စသျဖင့္ အျပတ္ဝယ္ယူထားတာပါ။ အင္တာနက္ဆုိင္ေတြ ဝယ္ယူမႈအမ်ားဆုံး plan ပါပဲ။
အင္တာနက္ဆုိင္ေတြ အယူမ်ားတာေတြကေတာ့
မေလး မိနစ္ ၄၀၀ - ၁၇၀၀၀ က်ပ္
ကုိရီးယား မိနစ္ ၄၀၀ - ၁၇၀၀၀ က်ပ္
႐ုရွ မိနစ္ ၄၀၀ - ၁၇၀၀၀ က်ပ္
အိႏိၵယ မိနစ္ ၄၀၀ - ၁၂၀၀၀ က်ပ္
မေလး မိနစ္ ၁၂၀ - ၆၀၀၀ က်ပ္
ကုိရိးယား မိနစ္ ၁၂၀ - ၆၀၀၀ က်ပ္
တုိ႔ပဲျဖစ္ပါတယ္။
Skype ဝယ္ယူမယ္ဆုိရင္ ေရြးခ်ယ္စရာသုံးမ်ိဳး
(၁) Unlmited Call (တစ္လ ၇၅၀၀ (သုိ႔) ၁၅၀၀၀ က်ပ္ ၄၂ႏုိင္ငံသာ)
(၂) မိနစ္ပုတ္ျပတ္ (Limited Minute)
(၃)Credit တုိ႔ပဲျဖစ္ပါတယ္။
ဝယ္ယူမယ္ဆုိရင္ေတာ့
ONLINE BUSINESS GROUP ရဲ႕ partner ဆုိင္မ်ားတြင္ ဝယ္ယူႏုိင္ပါတယ္။
မိမိ အၾကိဳက္ဆံုး video ကို screen saver အျဖစ္ထားၾကရေအာင္ (.scr file Only 1 MB)
လံုး၀ အလန္းေလးဗ်ာ ။ .scr file ေလး 1 file ပဲ ။ အလုပ္လုပ္ပံုကေတာ့ မိုက္သလား မေမးနဲ ့။ အရင္ ကဆို မိမိ ကြန္ပ်ဴတာမွာ screen saver ေလးေတြကို တစ္ခါတည္း ျပဳလုပ္ၿပီးသား file ေလးေတြနဲ ့မိမိ စိတ္ၾကိဳက္ ပံုေလးေတြ ( ပံုအေသပဲရမွာေပ့ါ) ကိုပဲ ထားထား တတ္ၾကပါတယ္ ။ကြန္ပ်ဴတာ ကို အသံုးမျပဳပဲ 5 မိနစ္ 10 မိနစ္ (မိမိခ်ိန္ထားသေလာက္ေပ့ါေနာ္) ၾကာရင္ မိမိ ျပဳလုပ္ထားတဲ့ screen saver ေလး တက္တက္လာရင္ ၾကည္ႏူးစရာပါပဲ ။ ကြန္ပ်ဴတာ idle ျဖစ္သြားတာေပ့ါ ။
အခု ဒီ file ေလးကိုသာ ေဒါင္းၿပီး ေအာက္ပါ အတိုင္းသာ နည္းနည္း ျပဳျပင္ေပးလိုက္ပါ ။ အဲ့ဒါဆို မိမိ အၾကိဳက္ဆံုး video ေတြဟာ screen saver အျဖစ္နဲ ့ေရာက္ရွိလာမွာ ျဖစ္ပါတယ္ ။ video ေတြတင္ မကပဲ သီခ်င္း MTV File ေတြကိုလည္း ထားထားေပးလို ့ရတဲ့အတြက္ မိမိ အျပင္သြားေနတုန္း မိမိ ကြန္ပ်ဴတာေလးမွာ မိမိ ထားထားခဲ့တဲ့ သီခ်င္းေလးေတြနဲ ့video ေလးေတြ ေပၚလာမွာ ျဖစ္တဲ့ အတြက္ စိတ္ေက်နပ္မႈ အျပည့္အ၀ ရရွိေစမွာျဖစ္ပါတယ္ ။
အရင္ဆံုး file ေလးကို ေဒါင္းလိုက္ပါ ။ 1 MB ေက်ာ္ေက်ာ္ေလး ပဲ ရွိလို ့.. ေဒါင္းလုပ္ button ေလးကို ႏွိပ္လိုက္တာနဲ ့....
ရွလြတ္ ... ဆို .... ဖြတ္ .. ခနဲ .. .ၿပီးသြားပါလိမ့္မယ္(ေဒါင္းတာ ေျပာတာေနာ္) ။ ထံုးစံအတိုင္း ငါးေနရာမွာ တင္ေပးထားပါတယ္ ။ ( win 7 အသံုးျပဳသူေတြ မိမိ ကိုယ္တိုင္ စမ္းသပ္ အသံုးျပဳၾကည့္ၾကပါ ။ ရရင္ ရတယ္လို ့မွတ္ပါ ။ မရရင္ မရဘူးလို ့မွတ္ပါ ။ ရရင္လည္း ရတဲ့ အေၾကာင္းေလးေတာ့ ကြန္မန္ ့ေလး ေပးေစခ်င္ပါတယ္ ။ မရရင္လည္း မရဘူး လို ့ကြန္မန္ ့ေလး ေပးေစခ်င္ပါတယ္ ။ (ငါေတာ္ေတာ္လွ်ာရွည္တာပဲ ။ ) XP User ေတြ အတြက္ကေတာ့ လံုး၀ကို စပယ္ရွယ္ပါပဲ )

ZShare

IFile
Ziddu
ျဖည္ၿပီးသြားရင္ folder ေလးကို ဖြင့္ jb viscreen.scr ဆိုတဲ့ file ေလးမွာ right click ႏွိပ္


ၿပီးရင္ Select Folder ဆိုတဲ့ေနရာေလးကို click ၿပီး မိမိ video ေတြ ထားတဲ့ လမ္းေၾကာင္းကို ေရြးေပးးး ၿပီးရင္ test ဆိုတာေလးကို ႏွိပ္လိုက္ ....
အဲ့ဒါဆိုရင္ ... မိမိ ျပဳလုပ္ထားတဲ့ video ေလးနဲ ့screen saver ေလး တစ္ခု ကို လြယ္လြယ္ကူကူနဲ ့မပင္မပန္းပဲ ရရွိၿပီ ျဖစ္ပါတယ္ ခင္ဗ်ာ ။ အဆင္မေျပတာ တစ္ခုခု ရွိခဲ့ရင္ ဆက္သြယ္ၿပီး ေမးျမန္းႏိုင္ပါတယ္ ခင္ဗ်ာ ။
သီခ်င္းေခြတြင္ထည့္သြင္းထားေသာ ဗိုင္းရပ္စ္အေၾကာင္း
ခိုးကူးသူေခြက ျဖန္႔ခ်ိတဲ့ ခိုးကူးလက္ေရြးစင္ေခြတစ္ေခြျဖစ္အင္တာနက္စုစည္းမႈ ဆိုတဲ့ ဒီဗီြဒီသီခ်င္းေခြမွာ ဗိုင္းရပ္စ္တစ္ေကာင္
ပါရွိလာပါတယ္။ အဲဒီ ခိုးကူးသူေတြကေန သက္သက္မဲ့ထည့္ထားျခင္း ျဖစ္ပါတယ္။
တကယ္တမ္းေတာ့ ဗိုင္းရပ္စ္မဟုတ္ပါဘူး။ Windows XP တက္လာဖို႔အတြက္
လိုအပ္တဲ့ဖိုင္ေတြကို ဖ်က္ဆီးပစ္တဲ့ Batch ဖိုင္ေလးတစ္ဖိုင္
ထည့္ေပးလိုက္ျခင္း ျဖစ္ပါတယ္။ ဖိုင္ရဲ႕နာမည္က pro.bat ပါ။
အဲဒီ Batch file ကို ေခြထည့္လိုက္ရင္ Autorun ေအာင္မို႔ Autorun.inf ဖိုင္ပါ ထည့္ထားပါတယ္။ ဒါေၾကာင့္မို႔ Windows XP ကို အသံုးျပဳေနၿပီး Autorun ကို Disable လုပ္မထားတဲ့ ကြန္ပ်ဴတာမ်ား ခံရမွာပါ။ ေခြကို My
Computer ကေန DoubleClick ႏွိပ္ၿပီး ဖြင့္ရင္လည္း ခံရမွာပါ။ အဲဒီလို
ကြန္ပ်ဴတာေတြမွာ အဲဒီေခြကို ထည့္လိုက္ရင္ ကြန္ပ်ဴတာဟာ Shutdown
က်သြားပါလိမ့္မယ္။ ျပန္ဖြင့္ရင္ Windows တက္လာမွာ မဟုတ္ေတာ့ပါဘူး။
ဒါေၾကာင့္မို႔ အဲဒီ အင္တာနက္စုစည္းမႈေခြကို ေရွာင္ႏိုင္ေအာင္မို႔
ဒီေဆာင္းပါေလးနဲ႔ ခ်စ္လွစြာေသာစာဖတ္သူေတြကို အသိေပးလိုက္ရျခင္းျဖစ္်ပါတယ္။
တကယ္လို႔ ခံလိုက္ရၿပီးၿပီဆိုရင္ ကိုယ့္ကြန္ပ်ဴတာေလး ျပန္ေကာင္းသြားေအာင္ ျပင္နည္းေလးပါ ဆက္ေျပာလိုက္ပါဦးမယ္။
အဲဒီေခြထဲမွာပါတဲ့ Batch file ဟာ C: partition ေအာက္မွာရွိတဲ့ ေအာက္ပါဖိုင္ေတြကို ဖ်က္ပစ္ပါတယ္။
ntdetect.com
boot.ini
msdos.sys
io.sys
ေနာက္ Windows folder ထဲက ေအာက္ပါဖိုင္ေတြကို ဖ်က္ပစ္ပါတယ္။
win.ini
win.com
system.ini
ဒါေၾကာင့္ ျပန္ေကာင္းဖို႔အတြက္ အေပၚကဖိုင္ေတြကို ကိုယ့္ကြန္ပ်ဴတာထဲ
ျပန္ထည့္ေပးရပါမယ္။ ျပန္ထည့္နည္းက ႏွစ္မ်ိဳးရွိပါတယ္။ တျခား Windows XP
တင္ထားတဲ့ ကြန္ပ်ဴတာတစ္လံုးမွာ ကိုယ့္ hard disk ကို ခ်ိတ္ၿပီး
ျပန္ထည့္တာရယ္၊ Windows ေခြကေန ျပန္ထည့္တာရယ္ပါ။
တျခားကြန္ပ်ဴတာမွာ ကိုယ့္ Hard Disk ေလး ခ်ိတ္ဖို႔အဆင္ေျပတဲ့သူေတြအဖို႔ေ
Copy Paste လုပ္ၿပီး ျပန္ထည့္ရင္ ရသြားပါလိမ့္မယ္။
ေခြကေန ျပန္ထည့္လိုသူမ်ားအဖို႔ေတာ့ ေအာက္ပါအခ်က္မ်ားကို အရင္သိထားသင့္ပါတယ္။
(၁) boot.ini ဟာ Windows ေခြထဲမွာ မပါပါဘူး။ အသစ္ေရးေပးရပါမယ္။
(၂) io.sys နဲ႔ msdos.sys ဟာလည္း ေခြထဲမွာမပါပါဘူး။ ဒါေပမဲ့ အဲဒီဖိုင္ႏွစ္ဖိုင္မရွိလည္း Windows တက္ပါတယ္။
ကဲ ပထမဆံုး Windows ေခြထဲမွာပါတဲ့ ntdetect.com ကို C: ထဲ ထည့္နည္း ၾကည့္ရေအာင္။
Windows ေခြကို ကိုယ့္ CD Drive ထဲထည့္ပါ။ ေခြကေန Boot လုပ္ပါ။ Press any key to
boot from CD လို႔ေပၚလာတဲ့အခါ Keyboard ကေန Key တစ္ခုခုကို ႏွိပ္လိုက္ပါ။
Loading လုပ္ေနတာကို ခဏေစာင့္ပါ။ ၿပီးသြားရင္ Screen တစ္ခု
ေပၚလာပါလိမ့္မယ္။ အဲဒီမွာ Windows တင္မယ္ဆိုရင္ Enter ေခါက္ပါ။ Windows ကို
ျပင္မယ္ဆိုရင္ R ႏွိပ္ပါလို႔ ေရးထားပါလိမ့္မယ္။ ျပင္မွာမို႔လို႔ R ကို
ႏွိပ္ပါ။
အဲဒီအခါ Recovery Console ပြင့္လာပါလိမ့္မယ္။ Recovery Console မွာ Admin password ေတာင္းပါလိမ့္မယ္။ ရိုက္ထည့္ေပးလိုက္ပါ။
ၿပီးရင္ ေအာက္မွာေရးထားတဲ့ Command ကို ရိုက္ထည့္ပါ။
Copy X:386ntdetect.com C:
Enter ေခါက္ပါ။ X: ဆိုတဲ့ေနရာမွာ ကိုယ့္ CD Drive ရဲ႕ Drive Letter ကို အစားထိုးေပးရပါမယ္။
ေနာက္ထပ္ win.ini, win.com နဲ႔ system.ini ကို ေခြထဲကေန C:Windows ထဲ ထည့္ရပါမယ္။
Copy X:386win.in_ C:Windowswin.in
copy X:386win.co_ C:Windowswin.com
copy X:386ystem.in_ C:Windowsystem.ini
ေနာက္ဆံုးတစ္ဆင့္အေနနဲ႔ C: ထဲမွာ boot.ini ေရးေပးဖို႔ပဲ က်န္ပါတယ္။ ဒါမ်ိဳးလုပ္ပါ။
bootcfg /list
အဲဒီလိုရိုက္လိုက္တဲ့အခါမွာ Windows ရွိေနတဲ့ လမ္းေၾကာင္းကို ရွာၿပီး ျပေပးပါလိမ့္မယ္။
bootcfg /add
အေစာက ရွာေတြ႕ခဲ့တဲ့ လမ္းေၾကာင္းကို ထည့္တာပါ။
အားလံုးၿပီးသြားရင္ Restart လုပ္လိုက္ပါ။ သင့္ Windows ေလး ျပန္တက္လာပါလိမ့္မယ္။
လူအမ်ားကို ဒုကၡေပးေသာသူမ်ားနဲ႔ ကင္းေ၀းႏိုင္ၾကပါေစ။
Software မလိုဘဲ တကမၻာလံုးရဲ႔ TV လိုင္းၾကည့္မယ္။
ဘာ Software မွ မလိုဘူး..ဘာစေလာင္းမွမလိုဘူး..ေTV လိုင္း..ၾကည့္ျခင္တဲ႔ ႏိုင္ငံလိုင္းကိုေရြးျပီး..အခမဲ
ေဘးနားမွာ က်န္းမာေရး၊သတင္း၊အားကစား၊ရုပ္
shopping၊ ရာသီဥတု..စသည့္ျဖင့္ ႏိုင္ငံအသီးသီးရဲ႔ TV လိုင္းမ်ားရွိပါတယ္။
http://wwitv.com ကိုႏွိပ္ျပီး၀င္ေရာက္ၾကည့္ရႈႏို
Windows 7 Start Button Creator 1.0

Windows 7 Start Button Creator 1.0 | 5 MB
Windows 7 Start Button Creator - This is a little program to easily change the look of the button "Start" Windows 7 by replacing the corresponding graphics on your own.

nglish ေလ႕လာေနတဲ႕သူငယ္ခ်င္းေတြအတြက္ Oxford Word Skills Advanced software !!!
Unrated |

Free Download From MedaFire
http://www.mediafire.com/?
Free Download From ifile.it
http://ifile.it/ey8wau2/
http://ifile.it/hu4byzc/
http://ifile.it/6vhgjpl/
Free Download From Ziddu.com
http://www.ziddu.com/download/
http://www.ziddu.com/download/
http://www.ziddu.com/download/
Download sites အမ်ိဳးမ်ိဳးမွ Download နည္းအမ်ိဳးမ်ိဳး
Download from Mediafireအလြယ္ဆံုး Medifire ကေနစပါမယ္.. Download software ဆိုတဲ႔လင့္ကိုႏွိပ္လိုက္၊ဒါမွ
ကို paste ထည့္လိုက္ျပီးရင္

ႏိုင္ပါျပီး
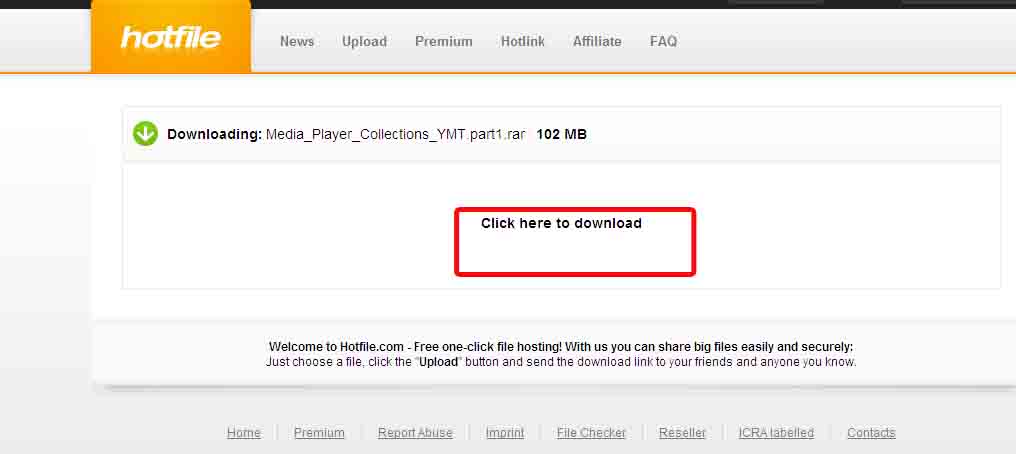
Download Hotfile
Hotfile မွာ Download နည္းလမ္းျဖစ္ပါတယ္.နည္းနည္းဆင့္
ကိုယ္႔က တခု Download လုပ္ထားတဲ႔အခ်ိန္မွာ ေနာက္တခု Download လုပ္လို႔မရပါဘူး. တခု Download
လုပ္ျပီျပီးျခင္းမွလဲ ေနာက္တခု Download လုပ္လို႔မရပါဘူး..သူ႔သတ္မွတ္ထား
ကို Download လုပ္ရမွာျဖစ္ပါတယ္။
 ဒီပံုေအာက္ပံုမွာ အနီေရာင္ကြင္းေလးမွာရွိတဲ႔ Seconds ကိုေစာင့္ရမွာျဖစ္ပါတယ္။

Download from Fileserve


tune uo 2010

ကြန္ပ်ဴတာတစ္လံုးအတြက္ မရွိမျဖစ္ Program တစ္ခုလို႔ေတာင္ေျပာလို႔ရပါတယ္။ အသံုးျပဳရတာလည္း လြယ္ကူပါတယ္။ သူ႔မွာပါတဲ့ 1-Click Maintenace Function ဟာဆိုရင္ ကြန္ပ်ဴတာသိပ္မကၽြမ္းက်င္သူမ်ား
Download Here

Burn ခ်င္တာ Burn ၾကဗ်ိဳ႕
Burn and update data discs
Burn data to discs and update previously burned discs by adding and removing files and folders.
Rip and burn music
Rip and burn music
Rip music from CDs and burn music to audio CDs and MP3 discs on CD, DVD and Blu-ray in a variety of formats.
Rip and burn music
Burn movies to DVDs and data discs
In addition to the new slideshow DVDs you can burn video DVDs, Video CDs (VCD), Super Video CDs (SVCD) and data video discs.
Copy CDs, DVDs and Blu-ray discs
Copy CDs, DVDs and Blu-ray discs
Just insert a disc, select Copy to image/ Burn disc from image and you’re ready to copy.
Create and burn disc images
Create and burn disc images
You can both create and burn ISO, CUE/BIN image formats.
Create and burn disc images
Erase rewriteable discs
Quick and easy erase functions for reusing rewriteable discs.
What’s cool:
* Burn files and folders on data CDs/DVDs/Blu-ray discs
* Burn Audio CDs from WAV, MP3, FLAC, WMA and Ogg Vorbis files
* Burn MP3-CDs from your MP3 files
* Burn Video DVD, Video CD (VCD) or Super Video CD (S-VCD)
* Create and burn CD/DVD/Blu-ray disc images
* Burn speed and other options can all be set automatically
* Make copies from audio, video or data discs easily
* Interactive troubleshooting assistant for solving hardware and media problems
* Save project files so that you can burn the same discs again later
* Erase CD-RWs / DVD+RWs / DVD-RWs/ DVD-RAM/ BD-REs
* Integrated support for over 1,700 CD, DVD and Blu-ray burners
* ... and much more!
Free Download From MediaFire
http://www.mediafire.com/file/
Free Download From ifile.it
http://ifile.it/c3i65vm/Cool%
Free Download From ziddu.com
http://www.ziddu.com/download/

ေခါင္းစဥ္ေလးထဲက အတိုင္းပဲဗ်ာ ။ CD , DVD ROM ေတြ ရဲ ့right click မွာ eject ဆိုတာပဲ ပါတယ္ဗ် ။ အဲ့ဒါေၾကာင့္ right click ႏွိပ္ၿပီး eject လုပ္လိုက္လည္း အေခြထည့္ခ်င္ရင္ ခလုတ္ေတာ့သြား ႏွိပ္ေနရတာပဲ ။ အဲ့ဒါဆို ဘာထူးေတာ့မွာလဲ ဗ် ။ ခလုတ္ပဲ ႏွစ္ခ်က္ ႏွိပ္လိုက္ေတာ့မွာေပ့ါ ။ ဟုတ္ဘူးလား ။ အခု အဲ့လို လုပ္စရာမလိုေတာ့ဘူးဗ်ာ ။ CD , DVD ROM ေလးမွာ right click ေလး ႏွိပ္ ... eject ေလး လုပ္ ... ။ ပံုစံမပ်က္ ထုိင္လ်က္နဲ ့ပဲ အေခြေလးထည့္ (စတိုင္ေလး နည္းနည္းထုတ္) .. ။ ၿပီးရင္ right click မွာပဲ insert ကို ႏွိပ္လိုက္တာနဲ ့အေခြ ျပန္၀င္သြားပါလိမ့္မယ္ ။ ဟဲ ဟဲ ။ အဆင္မေျပဘူးလားဗ်ာ ။ ( Casing ကို ေအာက္မွာ ထားတဲ့ သူေတြ ကုန္းကုန္း ၿပီး CD ROM ေတြရဲ ့ခလုတ္ကို ႏွိပ္ရတဲ့ ရန္က ကင္းေ၀းသြားတာေပ့ါ )


Languageက ေျခာက္မ်ိဳးပါတယ္ English, Spanish, French, Italian, German, Chinese!!!
Serial Keys ေတြလဲပါတယ္
Free Download From MediaFire
http://www.mediafire.com/?
Free Download From ifile.it
http://ifile.it/as4zkp5/Nero.
http://ifile.it/h0gut1p/Nero.
http://ifile.it/bkv1qm6/Nero.
http://ifile.it/6q7lfe9/Nero.
http://ifile.it/dkeqjf9/Nero.
http://ifile.it/ej0q2ps/Nero.
http://ifile.it/uap3hlb/Nero.
http://ifile.it/y72batl/Nero.
http://ifile.it/q2ngjof/Nero.
http://ifile.it/mx0u73z/Nero.
http://ifile.it/pub6od1/Nero.
Free Download From ziddu.com
http://www.ziddu.com/download/
http://www.ziddu.com/download/
http://www.ziddu.com/download/
http://www.ziddu.com/download/
http://www.ziddu.com/download/
http://www.ziddu.com/download/
http://www.ziddu.com/download/
http://www.ziddu.com/download/
http://www.ziddu.com/download/
http://www.ziddu.com/download/
http://www.ziddu.com/download/
VCD,CD,DVD,SVCD,Data CD, Blue Ray Dics ေတြ Burn ဖုိ႕ Cool Burning Studio v4.1.1.1 Full Free Download!!!
Burn ခ်င္တာ Burn ၾကဗ်ိဳ႕
Burn and update data discs
Burn data to discs and update previously burned discs by adding and removing files and folders.
Rip and burn music
Rip and burn music
Rip music from CDs and burn music to audio CDs and MP3 discs on CD, DVD and Blu-ray in a variety of formats.
Rip and burn music
Burn movies to DVDs and data discs
In addition to the new slideshow DVDs you can burn video DVDs, Video CDs (VCD), Super Video CDs (SVCD) and data video discs.
Copy CDs, DVDs and Blu-ray discs
Copy CDs, DVDs and Blu-ray discs
Just insert a disc, select Copy to image/ Burn disc from image and you’re ready to copy.
Create and burn disc images
Create and burn disc images
You can both create and burn ISO, CUE/BIN image formats.
Create and burn disc images
Erase rewriteable discs
Quick and easy erase functions for reusing rewriteable discs.
What’s cool:
* Burn files and folders on data CDs/DVDs/Blu-ray discs
* Burn Audio CDs from WAV, MP3, FLAC, WMA and Ogg Vorbis files
* Burn MP3-CDs from your MP3 files
* Burn Video DVD, Video CD (VCD) or Super Video CD (S-VCD)
* Create and burn CD/DVD/Blu-ray disc images
* Burn speed and other options can all be set automatically
* Make copies from audio, video or data discs easily
* Interactive troubleshooting assistant for solving hardware and media problems
* Save project files so that you can burn the same discs again later
* Erase CD-RWs / DVD+RWs / DVD-RWs/ DVD-RAM/ BD-REs
* Integrated support for over 1,700 CD, DVD and Blu-ray burners
* ... and much more!
Free Download From MediaFire
http://www.mediafire.com/file/
Free Download From ifile.it
http://ifile.it/c3i65vm/Cool%
Free Download From ziddu.com
http://www.ziddu.com/download/
CD,DVD ROM ရဲ ့Right Click မွာ Insert ေလး ထည့္ထားရေအာင္
ေခါင္းစဥ္ေလးထဲက အတိုင္းပဲဗ်ာ ။ CD , DVD ROM ေတြ ရဲ ့right click မွာ eject ဆိုတာပဲ ပါတယ္ဗ် ။ အဲ့ဒါေၾကာင့္ right click ႏွိပ္ၿပီး eject လုပ္လိုက္လည္း အေခြထည့္ခ်င္ရင္ ခလုတ္ေတာ့သြား ႏွိပ္ေနရတာပဲ ။ အဲ့ဒါဆို ဘာထူးေတာ့မွာလဲ ဗ် ။ ခလုတ္ပဲ ႏွစ္ခ်က္ ႏွိပ္လိုက္ေတာ့မွာေပ့ါ ။ ဟုတ္ဘူးလား ။ အခု အဲ့လို လုပ္စရာမလိုေတာ့ဘူးဗ်ာ ။ CD , DVD ROM ေလးမွာ right click ေလး ႏွိပ္ ... eject ေလး လုပ္ ... ။ ပံုစံမပ်က္ ထုိင္လ်က္နဲ ့ပဲ အေခြေလးထည့္ (စတိုင္ေလး နည္းနည္းထုတ္) .. ။ ၿပီးရင္ right click မွာပဲ insert ကို ႏွိပ္လိုက္တာနဲ ့အေခြ ျပန္၀င္သြားပါလိမ့္မယ္ ။ ဟဲ ဟဲ ။ အဆင္မေျပဘူးလားဗ်ာ ။ ( Casing ကို ေအာက္မွာ ထားတဲ့ သူေတြ ကုန္းကုန္း ၿပီး CD ROM ေတြရဲ ့ခလုတ္ကို ႏွိပ္ရတဲ့ ရန္က ကင္းေ၀းသြားတာေပ့ါ )
ဘာမွ သိပ္အမ်ားၾကီးလုပ္စရာ မလိုပါဘူး ။ dll file ေလး တစ္ဖိုင္ကို system 32 ထဲ ကူးထည့္ၿပီး registry file ေလးကို run ေပးလိုက္ရံုပါပဲ ။ ( 155 KB တဲ့...ဘယ္လို ေဒါင္းလို ့ေဒါင္းလိုက္မွန္းေတာင္ သိမွာ မဟုတ္ဘူးေနာ္ ။ )
MegaUpload , IFile ZShare နဲ ့Ziddu ေလးေနရာမွာ တင္ေပးထားတယ္ဗ်ာ ။ ( Meidafire က လင့္ခ္ ပ်က္သြားလို ့။ အဲ့ဆိုဒ္ေလးဆိုဒ္ကပဲ အဆင္ေျပသလို ဆြဲလိုက္ၾကပါဗ်ာ ။)
Nero သံဳးတဲ႕သူေတြအတြက္ Nero Multimedia Suite 10.5 Platinum HD Full Free Download !!!
Languageက ေျခာက္မ်ိဳးပါတယ္ English, Spanish, French, Italian, German, Chinese!!!
Serial Keys ေတြလဲပါတယ္
Free Download From MediaFire
http://www.mediafire.com/?
Free Download From ifile.it
http://ifile.it/as4zkp5/Nero.
http://ifile.it/h0gut1p/Nero.
http://ifile.it/bkv1qm6/Nero.
http://ifile.it/6q7lfe9/Nero.
http://ifile.it/dkeqjf9/Nero.
http://ifile.it/ej0q2ps/Nero.
http://ifile.it/uap3hlb/Nero.
http://ifile.it/y72batl/Nero.
http://ifile.it/q2ngjof/Nero.
http://ifile.it/mx0u73z/Nero.
http://ifile.it/pub6od1/Nero.
Free Download From ziddu.com
http://www.ziddu.com/download/
http://www.ziddu.com/download/
http://www.ziddu.com/download/
http://www.ziddu.com/download/
http://www.ziddu.com/download/
http://www.ziddu.com/download/
http://www.ziddu.com/download/
http://www.ziddu.com/download/
http://www.ziddu.com/download/
http://www.ziddu.com/download/
http://www.ziddu.com/download/
Romantic ဆန္တဲ႕ ဓါတ္ပံဳ Frame ေလးေတြလုပ္ဖုိ႕ Frame Photo Creator 4.3.3 Full Free Download !!!

Install လုပ္ရန္
1. Rar File ကုိRight click ေထာက္ျပီး Extract Here လုပ္လုိက္ပါ
2.OdinFramePhotoCreator.exe ကုိ Double click နွိပ္ျပီး Run ပါ
3.Program ကုိ စ run တာနဲ႕ Order , Register ေပၚလာပါလိမ့္မယ္

4.Register ကုိ Click ျပီး ေပးထားတဲ႕ serial ကုိျဖည့္လုိက္ပါ

5.Done !!! Full version ျဖစ္သြားပါျပီ
ရုိဆန္တဲ႕ Photo Frame ေလးေတြ လုပ္ျပီး ေပ်ာ္ရႊင္ၾကည္နူးၾကပါေစဗ်ာ... :)
No comments:
Post a Comment